
Every workplace has its own language, and much of it is spoken without a single word. This silent conversation happens through the different types of safety signs – a visual system designed for one crucial purpose: to prevent accidents and protect lives. Don't think of them as mere wall decorations; they are silent guardians, with each colour and shape telling a critical story.
The Hidden Language of Workplace Safety
This guide is here to help you decode that language. In the UK, putting up a safety sign isn't just a helpful hint; it's a legal and moral duty for everyone on site. Their use is baked into key legislation designed to make every workplace safer. To really get why they matter so much, it's worth understanding the critical role of signage in commerce and life in a broader sense.
These signs take abstract dangers and turn them into clear, simple instructions. They create a visual vocabulary that anyone, from a new hire to a visitor, can understand instantly. This isn't some random system of colours and symbols; it's been carefully designed for immediate recognition, even from across the room or in the middle of an emergency.
The Foundation of UK Safety Signage
The legal backbone for all of this is the Health and Safety at Work etc. Act 1974. It’s the cornerstone of UK workplace safety, placing a clear duty on employers to protect the health and wellbeing of their people. A huge part of that responsibility is communicating risks clearly and effectively. The Health and Safety Executive (HSE) enforces this Act and provides guidance on its application.
Safety signs are the most direct and universal way to communicate risk. They cut through language barriers and give instant instructions, making them an essential tool in any real safety strategy.
This foundational law paves the way for the more specific regulations that dictate exactly how safety signs should look and where they should be placed, ensuring everyone is on the same page, no matter where they work.
The Five Main Types of Safety Signs
The UK system neatly sorts safety signs into five main categories, each with its own distinct look. This is done on purpose so you can get the gist of the message from the colour and shape alone, often before you've even had a chance to read the words.
We’ll be diving into these five key types:
- Prohibition Signs: These are the "Do Not" signs, telling you what you absolutely must not do.
- Warning Signs: These give you a heads-up about potential hazards or dangers lurking nearby.
- Mandatory Signs: These tell you what you must do, like wearing a hard hat or safety goggles.
- Safe Condition Signs: Your guides to safety. These point the way to first aid stations, emergency exits, and other safe spots.
- Fire Safety Signs: These show you where to find fire-fighting gear like extinguishers and fire alarms.
Getting to grips with this visual system is the first step. It's how you build a workplace that's not just compliant, but genuinely safer for everyone.
Understanding Your Legal Duties for Safety Signs
Figuring out the legal side of workplace safety in the UK can feel like wading through treacle, but when it comes to signs, the core ideas are refreshingly simple. This isn't just about dodging fines; it’s about creating a workplace where everyone, from the new apprentice to the seasoned manager, instinctively understands the risks around them.
The main piece of legislation you need to know about is The Health and Safety (Safety Signs and Signals) Regulations 1996. This is the rulebook that sets the standard for how businesses must communicate safety information visually. Think of it as creating a universal language for safety. Its whole purpose is to make sure that a "wet floor" sign in a Cornish factory looks the same as one in a Scottish warehouse, creating an instantly recognisable system that cuts through confusion.
Essentially, these regulations are the UK’s way of adopting a European-wide approach to harmonise safety communication. It means no guesswork, just immediate understanding. You can get more details on how these regulations pull everything together over at our in-depth guide to UK health and safety signs.
It All Starts With a Risk Assessment
Before you even browse for a single sign, you need to start with a risk assessment. This is the absolute, non-negotiable first step and the bedrock of your entire safety plan. A risk assessment is really just a methodical look at what could potentially harm people in your workplace. This process is mandated by the Management of Health and Safety at Work Regulations 1999.
Picture yourself as a detective investigating your own premises. You need to hunt for hazards—be it a perpetually slippery patch of floor, deafening machinery, or a chemical cupboard—and then figure out the smartest way to control that risk. A safety sign only enters the picture when a risk can't be completely engineered away or removed.
For example, if a piece of machinery is unavoidably loud, a mandatory sign telling staff to wear ear protection becomes critical. The sign is that final, vital nudge to take a specific action to stay safe.
Your Key Responsibilities Under the Rules
Getting compliant with the 1996 regulations is more than a one-off shopping trip for signs. It's an ongoing commitment, and as an employer, you have a few key duties to stay on top of.
Here’s what it boils down to:
- Spotting the Need: If a significant risk is still present after you've tried all other practical safety measures, you must put up a sign.
- Keeping them Maintained: Signs have to be kept in good nick. A sign that's faded, caked in grime, or cracked isn't just non-compliant—it's dangerously useless.
- Training Your Team: Your people need to know what the signs mean. This involves proper instruction and training, especially for new starters or when a new hazard (and sign) is introduced.
A safety sign is never a replacement for getting rid of a hazard. It’s a communication tool, one crucial layer in your safety system, and often the last line of defence for your team.
Ultimately, your responsibilities go beyond just ticking boxes on a checklist. A safe workplace also relies on crystal-clear emergency evacuation procedures and fostering a genuine culture of safety. It's about making sure everyone speaks the same visual language that keeps them protected, turning a legal requirement into a lived, everyday reality.
How Colours and Shapes Communicate Critical Information
Ever wonder how a simple sign can tell you so much, so quickly, without you even having to think about it? Safety signs aren't just random bits of plastic; they're a carefully crafted visual language. Colours and shapes act as a universal alphabet, designed to be understood in a split second.
This system is deliberately simple. It cuts through language barriers and mental clutter, getting a life-saving message to your brain in the fraction of a second it takes to glance at a sign. In an emergency, that fraction of a second is everything.
This intuitive code didn't just happen by chance. It's the result of decades of refinement in UK safety law. While early rules like the Factories Act 1961 laid some groundwork, it was the British Standard BS 5378 in the 1970s that really brought in the unified system of colours and pictograms we see today. If you're curious, you can dive deeper into the fascinating history of UK safety signs to see how this visual language evolved.
The whole system is built on the core principles of the Health and Safety (Safety Signs and Signals) Regulations 1996. Each specific combination of colour and shape is engineered to deliver a very particular kind of message. Let's break down the five main categories you'll see every day.
To make it even clearer, here's a quick cheat sheet covering the main types of safety signs and what their appearance instantly tells you.
Safety Sign Categories at a Glance
| Category | Shape | Colour(s) | Meaning / Action Required |
|---|---|---|---|
| Prohibition | Circle with diagonal bar | Red circle/bar, black pictogram on white background | STOP. An action is strictly forbidden. |
| Warning | Triangle | Yellow triangle with black pictogram and border | CAUTION. A potential hazard is nearby. |
| Mandatory | Circle | White pictogram on a solid blue background | YOU MUST. A specific action is required. |
| Safe Condition | Square or Rectangle | White pictogram on a solid green background | SAFETY. This way to an exit, first aid, etc. |
| Fire Safety | Square or Rectangle | White pictogram on a solid red background | HERE IT IS. Location of fire equipment. |
This table is your starting point. By getting familiar with these basic rules, you'll be able to interpret almost any safety sign at a glance.
Red for Prohibition and Fire Safety
Our brains are hardwired to see red and think: danger, stop, pay attention. This powerful psychological shortcut makes it the perfect choice for two very different, but equally vital, types of safety signs.
First up, you have Prohibition Signs. These are the "Do Not..." signs of the workplace.
- Shape: A circle with a diagonal crossbar. It’s a visual full stop, an emphatic "NO".
- Colour: A bold red circle and bar over a black image on a plain white background.
- Meaning: Tells you an action is absolutely forbidden to prevent immediate danger.
But red is also used for Fire Safety Signs. These signs aren't telling you not to do something; they’re pointing you towards the tools you need to fight a fire.
- Shape: Square or rectangular. This helps avoid any mix-ups with the circular prohibition signs.
- Colour: A simple white pictogram on a solid red background.
- Meaning: Pinpoints the location of fire alarms, extinguishers, and hoses.
Yellow for Caution and Warning
Yellow is a naturally attention-grabbing colour. It's designed to make you pause and take a second look, acting as a critical heads-up for any potential hazards in the area.
Warning Signs use yellow to signal that you need to be careful.
- Shape: A triangle. The sharp, pointed shape subtly reinforces the idea of danger.
- Colour: A black pictogram inside a bright yellow triangle, framed with a black border.
- Meaning: Alerts you to a specific risk, like a slippery floor, high voltage, or the danger of falling objects.
Blue for Mandatory Actions
If red means "stop" and yellow means "be careful," then blue means "you must do this." Blue is often associated with instructions and information, making it the go-to colour for commands that are crucial for your safety.
Mandatory Signs spell out an action you are required to take, often involving personal protective equipment (PPE).
These signs are not friendly suggestions; they are direct orders. The action shown is the absolute minimum requirement for being in that area, put in place to protect you from a known risk.
- Shape: A solid circle. Unlike the red prohibition sign, this one represents a positive command.
- Colour: A white pictogram on a solid blue background.
- Meaning: Instructs you on a specific action you must take, such as wearing safety goggles, a hard hat, or high-visibility clothing.
Green for Safety and Escape
Across the world, green means "go," safety, and well-being. It's a reassuring colour that provides clear direction, which is exactly what you need in a stressful situation like an evacuation.
Safe Condition Signs are your guides to getting out of harm's way.
- Shape: Square or rectangular.
- Colour: A white pictogram on a solid green background.
- Meaning: Shows you where to find first aid kits, emergency exits, escape routes, and muster points.
Once you internalise this simple visual code, reading a safety sign becomes second nature. A quick glance is all it takes to understand the message and take the right action to keep yourself and others safe.
Real-World Examples of Essential Safety Signs
It's one thing to memorise the colours and shapes of safety signs, but it’s seeing them out in the wild that really makes the information click. Those abstract rules suddenly come to life when you can picture them in a familiar setting. Let's walk through some practical, everyday examples of the five main types of safety signs, putting each one into a real-world scenario to show exactly how it keeps people safe.
By looking at these signs in context, you'll see how their design connects directly to their purpose, reinforcing the silent but powerful language of workplace safety. You'll quickly get a feel for the vital role they play in any safe environment.
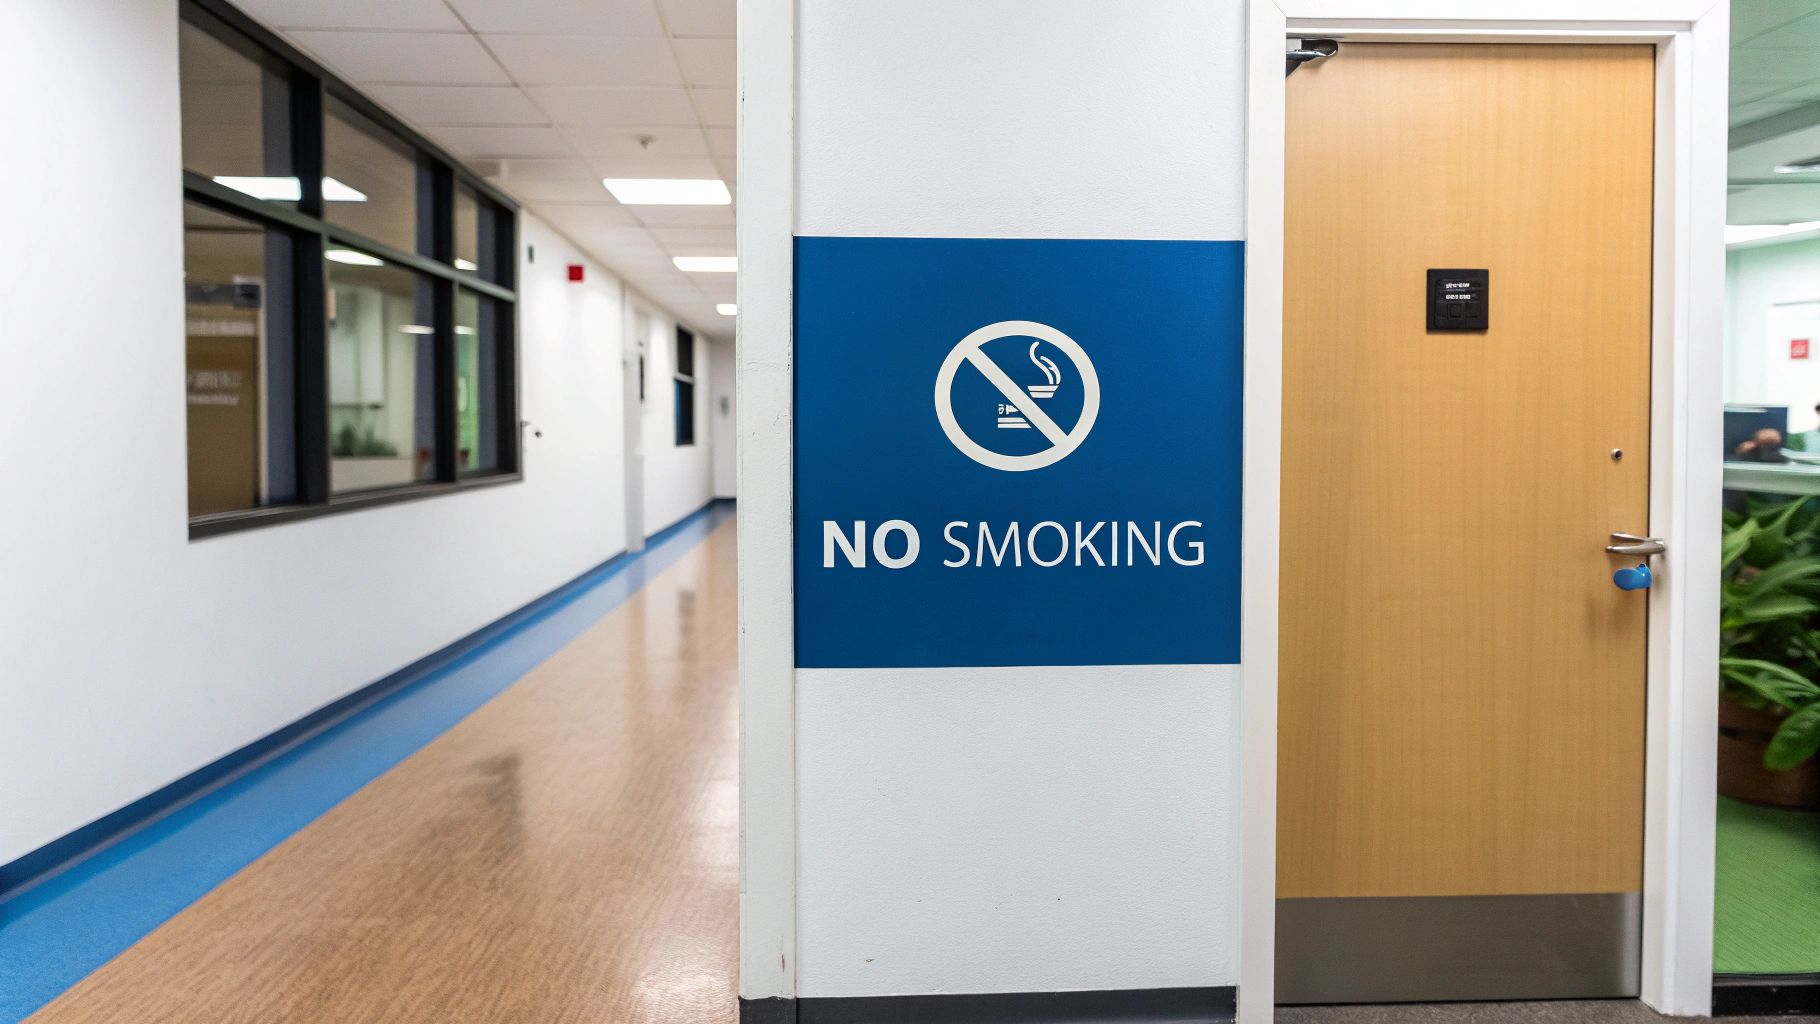
Prohibition Signs: The Unmistakable Stop
Imagine a busy workshop where flammable paints and solvents are stored. The air itself could be full of vapours that a single spark could ignite, triggering a devastating fire. This is the kind of hazard that demands an absolute, non-negotiable rule.
This is where you'll find a Prohibition Sign.
A bold red circle with a black pictogram of a lit cigarette, slashed through with a diagonal line – it’s instantly recognisable. The 'No Smoking' sign isn't a friendly suggestion; it's a direct, legally enforceable command. Its design—the universal symbol for 'stop'—is deliberately chosen to communicate immediate danger, as required by the Health and Safety (Safety Signs and Signals) Regulations 1996.
This single sign neutralises a massive risk by forbidding one specific action. It's a perfect example of a prohibition sign doing its job: protecting people and property with a clear, unmissable instruction.
Warning Signs: A Crucial Heads-Up
Now, picture the kitchen of a bustling restaurant or a staff canteen during the lunch rush. Spills are going to happen, and a freshly mopped floor creates a serious slip hazard. While the team rushes to clean it up, there’s that window of time when the floor is wet and dangerous.
This is a job for a Warning Sign.
The bright yellow, triangular 'Slippery Surface' sign is a familiar sight for a reason. Its purpose isn't to forbid anything but to give you a heads-up about a temporary or ongoing hazard. The yellow colour naturally grabs your attention, while the triangle shape is a subconscious signal for caution.
The sign is essentially saying, "Watch your step here, the ground isn't stable." It gives people the power to adjust their own behaviour—by walking slower or finding another route—to get past the risk safely. That’s the core job of a warning sign: make people aware so they can protect themselves.
Mandatory Signs: A Clear Command to Act
Step onto any active construction site in the UK. You might have cranes moving heavy loads overhead while work is happening on multiple levels below. The risk of something falling—from a dropped spanner to a piece of debris—is constant and poses a severe threat of head injury.
In this environment, a Mandatory Sign isn't just a good idea; it's an absolute necessity.
You'll see a solid blue circle with a simple white pictogram of a hard hat posted at every single entrance. The message is simple and absolute: 'Wear Hard Hats'. That blue circle means it's a direct order that you must obey to enter the area.
It’s not a choice. The sign communicates a condition of entry, a specific action every person must take to shield themselves from a known hazard. It’s a powerful demonstration of how mandatory signs enforce the use of personal protective equipment (PPE) as a critical line of defence. If you want to dig deeper into how these different sign categories work, you can find out more in our guide that asks, what types of safety signs are there in the UK?.
Safe Condition Signs: Guiding People to Safety
Think about a large, multi-floor office building. If an employee suddenly feels unwell or gets a minor cut, knowing where to find help quickly is crucial. In a moment of panic or distress, a clear and simple sign can make all the difference.
This is the role of a Safe Condition Sign.
A green rectangular sign with a white cross for 'First Aid' is placed in corridors and other shared spaces. It isn't warning you of danger or telling you what to do; it’s providing life-saving information. It guides people towards help and safety.
The iconic 'Fire Exit' signs fall into this category too, using the same green-and-white colour scheme to point out the safest escape route in an emergency. These signs are beacons of reassurance, offering clear, calm direction when you need it most.
Fire Safety Signs: Locating Lifesaving Equipment
Let's head back to that workshop. Even with the 'No Smoking' sign, other fire risks still exist, like an electrical fault. If a small fire does break out, the first few moments are absolutely critical. Staff need to know exactly where the fire-fighting gear is without wasting a single second. This requirement is reinforced by the Regulatory Reform (Fire Safety) Order 2005.
This is where Fire Safety Signs become indispensable.
You’ll see a solid red square with a white pictogram of a fire extinguisher mounted directly above the unit. The vibrant red makes it stand out against any background, so it’s easy to spot even if the room starts to fill with smoke.
Unlike the red circle of a prohibition sign, this red square or rectangle doesn't mean 'stop'. It means 'here'. It pinpoints the location of vital equipment—from extinguishers to fire alarm call points—ensuring that when an emergency strikes, no time is lost in the search.
Best Practices for Placing and Maintaining Your Signs
Let's be honest, a safety sign only works if someone actually sees it, understands it, and trusts what it says. Even the most perfectly designed sign is completely useless if it’s tucked away behind a stack of boxes or so faded you can't read it anymore.
Following best practices for placement and maintenance isn't just about keeping things neat and tidy; it’s a legal requirement under UK health and safety law. This is about turning your signs from simple wall decorations into an active, life-saving part of your safety culture.

Strategic Sign Placement
Where you put a sign is every bit as important as the message it carries. The whole point is to give people the right information at exactly the right time, allowing them to react before they stumble into a hazard. Getting the placement right is a cornerstone of the Health and Safety (Safety Signs and Signals) Regulations 1996.
Think about these core principles every single time you install a sign:
- High Visibility: Is it obvious? Signs need to be in a prominent, well-lit spot at a sensible eye level. They should be impossible for anyone approaching a potential hazard to miss.
- Clear Line of Sight: Make sure there's nothing in the way. That means no stacked materials, parked vans, or overgrown bushes blocking the view.
- Avoid Sign Clutter: Bombarding people with too many signs in one small area just creates sensory overload, and they'll end up ignoring all of them. Prioritise the most critical warnings and group related signs logically.
A sign's power is directly tied to its placement. It has to catch a person’s eye before they enter a risk zone, giving them enough time to see the message, process it, and act accordingly.
Diligent Sign Maintenance
Your duty of care doesn't stop the moment a sign goes up on the wall. The regulations are clear: signs must be properly maintained so they stay legible and effective. A damaged or grimy sign doesn’t just look unprofessional; it actively undermines trust. It suggests a standard of safety that is no longer being met, which can be more dangerous than having no sign at all.
A solid maintenance routine should be a non-negotiable part of your regular safety checks.
Your Maintenance Checklist:
- Regular Cleaning: Dirt, dust, and grime can easily obscure pictograms and text. Give your signs a clean periodically so their colours stay vibrant and the message is crystal clear.
- Inspect for Damage: Keep an eye out for any cracks, fading, peeling, or even vandalism. A faded warning sign loses its visual punch, while a cracked one could become a physical hazard itself.
- Check for Relevance: Workplaces evolve. Layouts change, and so do risks. Always double-check that your signs are still relevant for the hazards that are actually present. If a risk has been removed, the sign should be, too.
By systematically placing and looking after every sign, you ensure they remain a reliable and crucial communication tool that genuinely keeps people safe.
Got Questions About Safety Signs? We’ve Got Answers.
Even when you've got a handle on the five main types of safety signs, things can get a bit fuzzy when you're trying to apply the rules on the ground. Let's clear up some of the most common questions that pop up about UK safety signage.
Are Pictograms Enough, or Do I Need Text as Well?
Think of it this way: in an emergency, you want the message to land instantly. That's why, under the Health and Safety (Safety Signs and Signals) Regulations 1996, the pictogram is king. It needs to be understood at a glance, no translation required.
But what if a symbol could be a bit ambiguous? Or the hazard is a little more complex? That's where adding some text can be a lifesaver. If a few well-chosen words help people grasp the message faster without making the sign a cluttered mess, it’s not just allowed – it’s good practice.
How Often Should I Be Reviewing My Workplace Safety Signs?
Your safety signs aren't a 'fit and forget' job. You should give them a proper once-over during your regular health and safety risk assessments. For most places, that means annually, or anytime there's a significant shake-up in the workplace.
A review is definitely on the cards after events like:
- Changing the layout of the building.
- Bringing in new machinery or chemicals.
- An accident or even a near-miss incident has occurred.
This simple check-in makes sure every sign is still relevant, in the right spot, and in good nick.
What's the Difference Between a Hazard and a Risk Sign?
It's easy to get these two tangled up, and in everyday chat, they're often used to mean the same thing. But technically speaking, a hazard is the thing that could cause harm – think of a drum of corrosive chemicals. The risk is the chance of that harm actually happening.
A warning sign (that classic yellow triangle) is there to flag up the hazard. Its job is to alert you to the associated risk, giving you the heads-up you need to take precautions and stay safe.
Knowing the 'why' behind each sign type is crucial. For instance, understanding when first aid signs are necessary can be just as vital as posting a warning.
For a complete range of legally compliant safety signs, from warning signs to fire safety equipment locators, trust The Sign Shed. Find exactly what you need to keep your workplace safe at https://www.thesignshed.co.uk.
Article created using Outrank
1 comment
Am so happy an glad to help me out